
There’s something incredibly satisfying about transforming ordinary household items into stunning pieces of décor. While many people throw away old cutting boards once they become worn, one creative DIY enthusiast discovered a way to give them a second life. By combining a few wooden boards with simple brackets and a central rod, he created a breathtaking tiered serving stand that looks like it belongs in a high-end kitchen boutique.
The result is both functional and beautiful. Perfect for charcuterie displays, desserts, fruits, cheeses, appetizers, or even seasonal decorations, this rustic centerpiece has become a favorite among DIY lovers. The best part? It costs a fraction of what a similar designer piece would cost in a store.
In this guide, you’ll learn exactly how to create your own multi-tier wooden serving stand using old cutting boards and a few basic materials.
Why This DIY Project Is So Popular
The popularity of rustic farmhouse décor continues to grow, and people are constantly searching for unique handmade pieces that combine style and practicality.
This tiered serving stand checks all the boxes:
- Reuses old cutting boards
- Creates a stunning centerpiece
- Saves money compared to store-bought versions
- Adds rustic charm to any gathering
- Can be customized to any size
- Makes a wonderful handmade gift
Whether you’re hosting a holiday dinner, wine night, birthday celebration, or brunch, this stand instantly elevates the presentation of your food.
The Finished Look
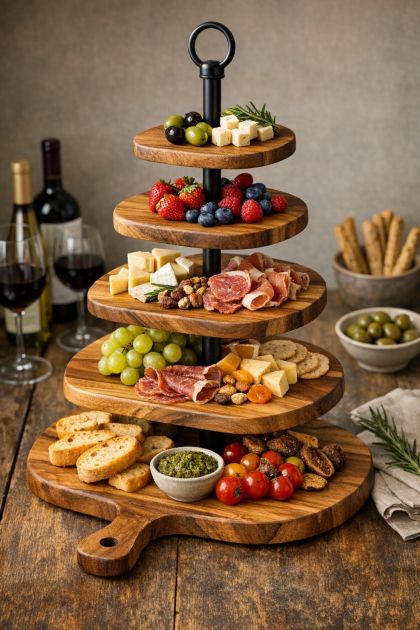
Imagine several wooden cutting boards stacked vertically, each level slightly smaller than the one beneath it. Fresh fruits, cheeses, crackers, cured meats, and decorative garnishes fill each tier, creating a display that looks straight out of a magazine.
The varying heights add visual interest while maximizing serving space, making it ideal for entertaining guests.
The natural wood grain gives the piece warmth and character, while the vertical design creates a dramatic focal point on any table.
Materials You’ll Need
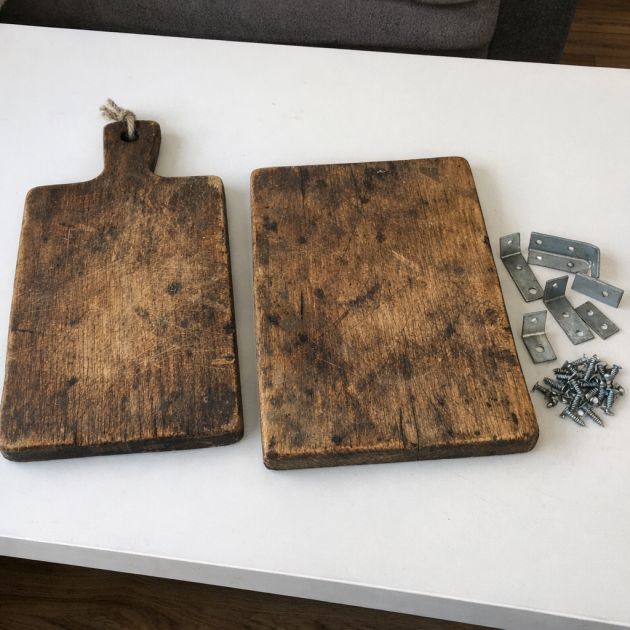
Before getting started, gather the following supplies:
| Materials | Purpose |
|---|---|
| 2–5 old cutting boards | Create the serving tiers |
| Threaded metal rod | Central support structure |
| Washers | Stabilize each board |
| Nuts | Secure tiers in place |
| Decorative brackets or spacers | Separate the levels |
| Drill and drill bits | Create center holes |
| Sandpaper | Smooth rough surfaces |
| Wood stain (optional) | Refresh appearance |
| Food-safe wood finish | Protect the wood |
| Handle or decorative top piece | Finishing touch |
Choosing the Right Cutting Boards
Not all cutting boards are ideal for this project.
Look for boards that:
- Are made from solid wood
- Have minimal cracking
- Feature attractive grain patterns
- Vary slightly in size
Different sizes help create the layered effect seen in professional serving stands.
Round boards work especially well, but rectangular or paddle-style boards can create a unique rustic appearance.
If your boards are heavily scratched, don’t worry. Sanding can restore much of their original beauty.
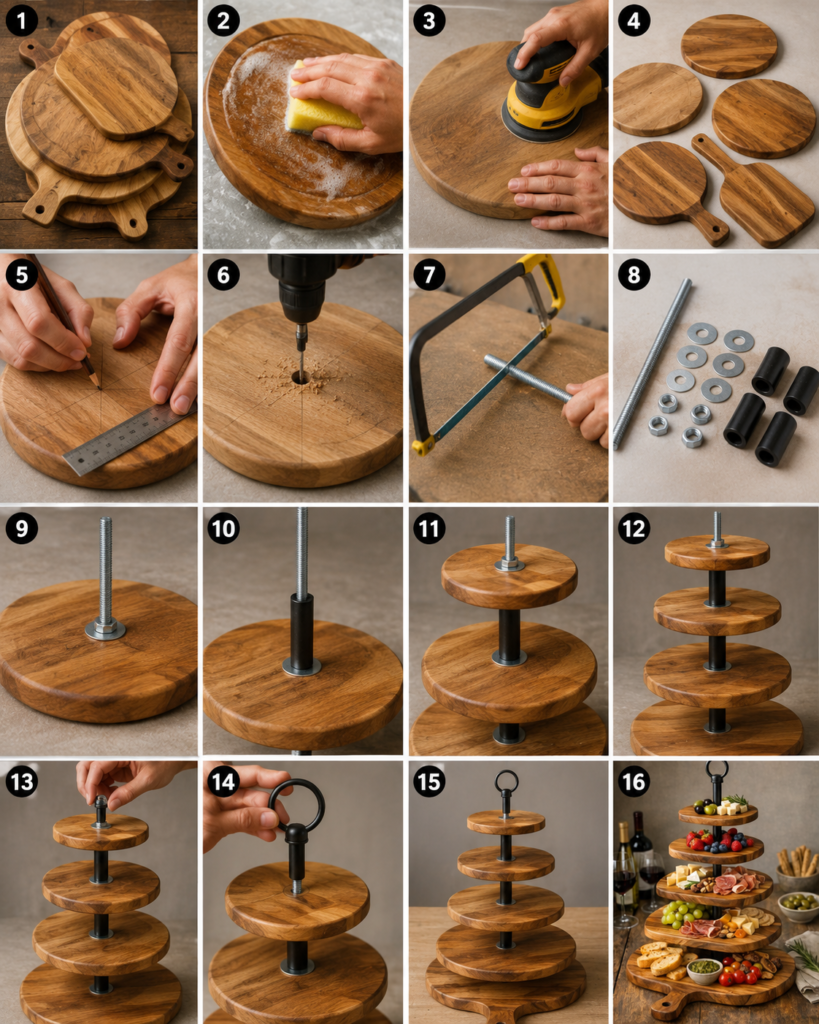
Step 1: Clean and Prepare the Boards
Step 1: Clean and Prepare the Boards
Before building, thoroughly clean each cutting board.
Wash them with warm water and mild soap.
Allow them to dry completely.
Once dry:
- Remove stains
- Eliminate grease residue
- Inspect for loose wood fibers
- Check for structural damage
This preparation ensures a cleaner and safer final product.
Step 2: Sand the Surfaces
Old cutting boards often have knife marks and rough spots.
Using medium-grit sandpaper:
- Smooth the entire surface
- Remove scratches
- Round sharp edges
- Reveal fresh wood underneath
Follow with fine-grit sandpaper for a silky finish.
The difference after sanding is often remarkable, making even old boards look nearly new again.
Step 3: Plan Your Tier Layout
Arrange your boards from largest to smallest.
Typically:
Bottom Tier
Largest board
Second Tier
Slightly smaller board
Third Tier
Medium board
Fourth Tier
Small board
Top Tier
Smallest board
Step back and evaluate the proportions before drilling.
This is your chance to adjust spacing and create a balanced appearance.
Step 4: Mark the Center Points
Accurate measurements are critical.
Secure it using:
- Washer
- Nut
Tighten firmly but avoid overtightening, which could crack the wood.
This bottom tier forms the foundation of the entire structure.
Step 8: Add Spacers Between Tiers
Spacers create the attractive gaps between levels.
Options include:
- Decorative brackets
- Wooden blocks
- Metal tubing
- Furniture spacers
Each spacer should be equal in height to maintain symmetry.
These gaps allow food and decorations to be displayed beautifully on every level.
Step 9: Continue Building Upward
Repeat the process:
- Add spacer
- Insert next board
- Add washer
- Tighten nut
Continue until all boards are installed.
As the structure grows, you’ll begin to see the dramatic tiered effect emerge.
Step 10: Install the Decorative Top
A decorative handle adds both function and style.
Popular options include:
- Metal ring handles
- Vintage drawer pulls
- Decorative knobs
- Rustic iron accents
The handle makes carrying the stand easier while completing the professional look.
Step 11: Apply a Food-Safe Finish
If the stand will hold food directly, use a food-safe finish.
Popular choices include:
- Mineral oil
- Beeswax finish
- Food-safe wood conditioner
Apply evenly across all wooden surfaces.
This helps:
- Protect against moisture
- Enhance wood grain
- Extend lifespan
The finish also gives the stand a rich, polished appearance.
Styling Your New Tiered Stand
One reason this project has become so popular is its versatility.
You can use it for nearly any occasion.
Charcuterie Display
Arrange:
- Cheeses
- Salami
- Prosciutto
- Crackers
- Nuts
- Olives
The varying levels create a luxurious presentation.
Dessert Tower
Fill each tier with:
- Cupcakes
- Cookies
- Brownies
- Macarons
Perfect for birthdays and weddings.
Seasonal Decor
Display:
- Pumpkins in autumn
- Pinecones during winter
- Flowers in spring
- Citrus fruits in summer
The stand transforms into a year-round centerpiece.
Budget Breakdown
Here’s an example of the cost savings:
| Item | Estimated Cost |
|---|---|
| Old cutting boards | Free–$10 |
| Threaded rod | $5–$10 |
| Nuts and washers | $3–$5 |
| Decorative handle | $5–$10 |
| Finish | $5–$15 |
Total: Approximately $20–$50
Comparable handmade tiered serving stands often sell for $100–$250 or more.
Common Mistakes to Avoid
Many first-time builders encounter a few avoidable issues.
Watch out for:
- Misaligned center holes
- Uneven spacers
- Overtightened hardware
- Unfinished wood surfaces
- Weak or damaged cutting boards
Taking your time during assembly results in a stronger and more attractive final product.
Why Everyone Wants One
What makes this project special isn’t just the appearance.
It tells a story.
Instead of throwing away old cutting boards, you’re transforming them into something useful, elegant, and conversation-worthy. Guests immediately notice the handcrafted design, and many are surprised to learn it was made from repurposed kitchen items.
The combination of sustainability, creativity, and functionality makes this DIY project stand out from countless other home décor ideas. Every stand is unique because every piece of wood has its own history, grain pattern, and character.
Final Thoughts
Most people would look at an old cutting board and see something ready for the trash. A creative DIY enthusiast sees potential. With a few brackets, a threaded rod, and a little imagination, worn kitchen boards can become a stunning multi-tier serving stand that rivals expensive boutique décor.
Whether you’re displaying charcuterie, desserts, fruits, or seasonal decorations, this project offers the perfect blend of rustic charm and practical function. Best of all, it’s an affordable weekend project that turns forgotten materials into a centerpiece everyone will admire—and probably want for themselves.


0 Comment:
Enregistrer un commentaire